
Introduction to Sun-Dried Tomato Sourdough Bread
If you’ve ever savored the rich flavors of sun-dried tomato sourdough bread, you know that homemade bread is simply unbeatable. Not only does it fill your kitchen with the most intoxicating aroma, but baking your own bread allows you to control every ingredient that goes into it. According to a study by the American Institute for Cancer Research, cooking at home can lead to healthier choices and eating habits. Plus, there’s something truly rewarding about creating something so delicious from scratch.
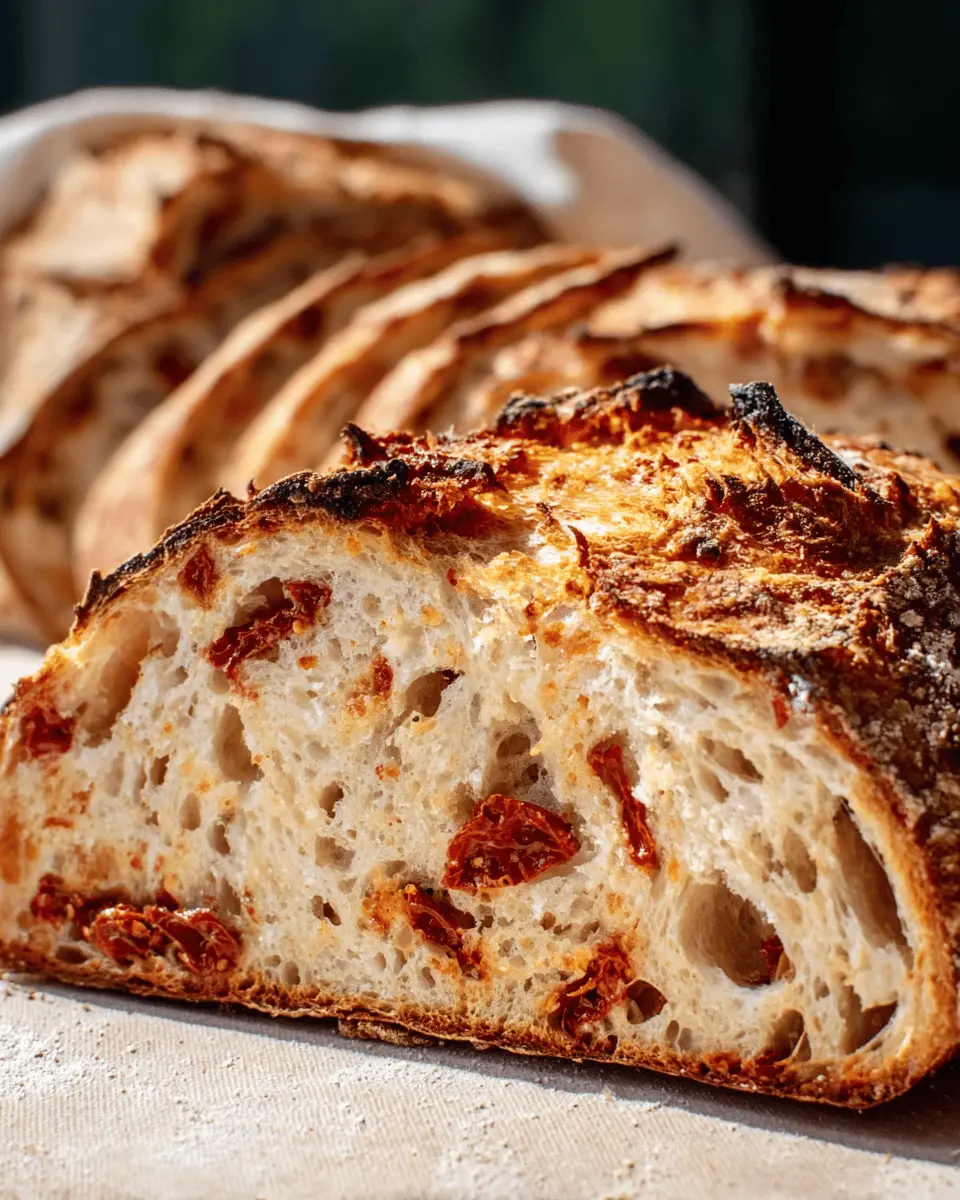
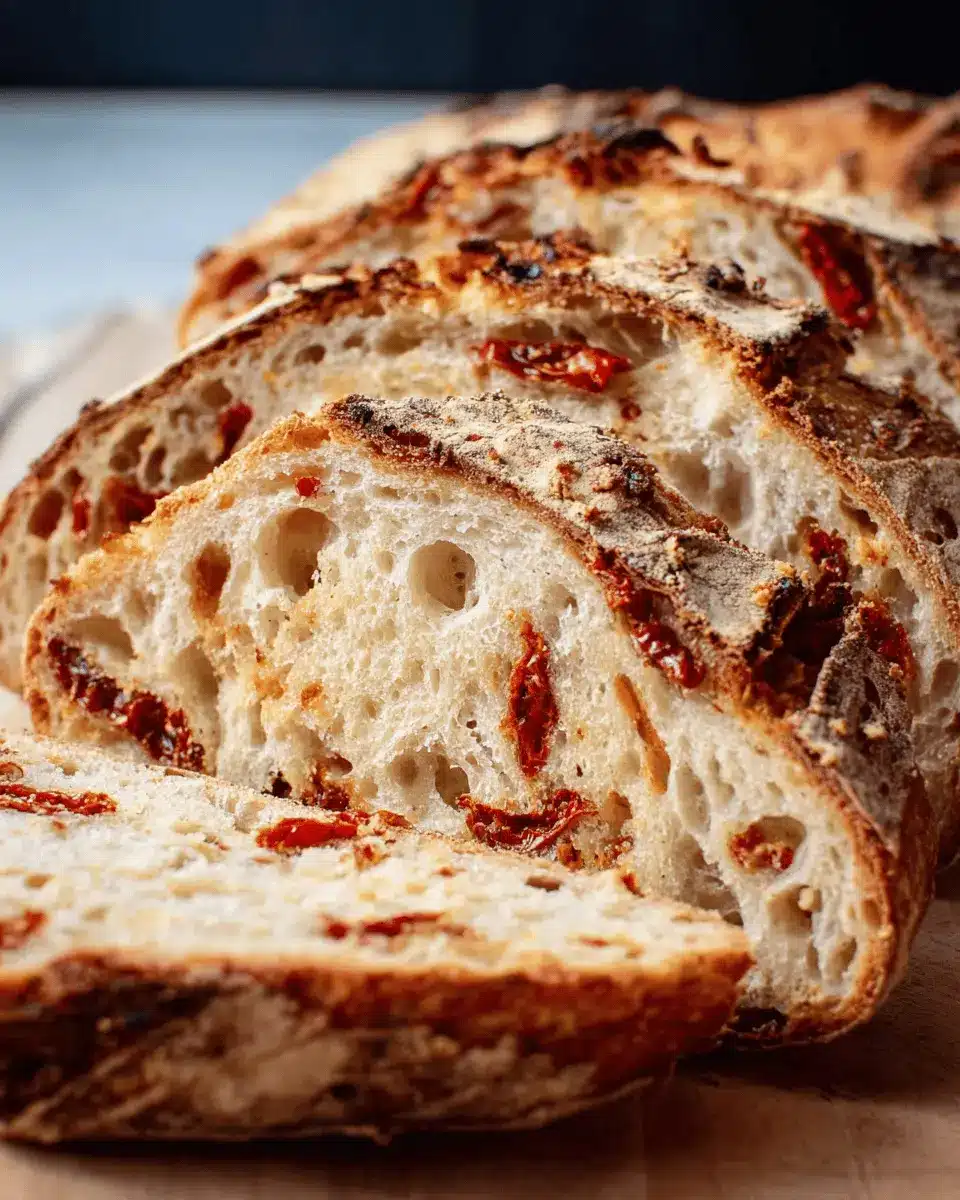
One of the best parts about this recipe is how it combines the unique tang of sourdough with the savory essence of roasted garlic and parmesan. Imagine biting into a warm slice, the chewy crust giving way to a soft, flavorful center. Perfect for a cozy dinner or as an impressive addition to your next gathering, this sun-dried tomato sourdough bread also makes stellar toast for breakfast or a delightful base for canapés.
So let’s dive into the details and make some magic in the kitchen! Whether you're a bread-making novice or a seasoned pro, this recipe is designed to guide you through each step of the process, ensuring you end up with a loaf that looks and tastes amazing.
Ingredients for Sun-Dried Tomato Sourdough Bread
Essential ingredients for success
Creating a delightful sun-dried tomato sourdough bread relies on a few key ingredients that come together to deliver flavor and texture. Here’s what you absolutely need:
- 5 cloves of garlic – adds a deep, savory note when roasted.
- 1 teaspoon of olive oil – helps in roasting the garlic, enhancing its sweetness.
- 1 ½ cups (360 grams) warm water (80-90℉) – activates your starter and hydrates the flour.
- ½ cup (100 grams) active sourdough starter – the heart of your bread, providing fermentation magic.
- 4 cups + 3 tablespoons (500 grams) bread flour – the foundation that gives structure.
- 3 ½ teaspoons (10 grams) Diamond Crystal Kosher Salt – balances flavors and strengthens the dough.
- ½ cup (70 grams) sun-dried tomatoes – infuses a wonderful tangy richness.
- ½ cup (50 grams) grated parmesan cheese – adds a nutty, savory flavor that complements the sun-dried tomatoes.
Optional add-ins for enhanced flavor
To take your sun-dried tomato sourdough bread to the next level, consider adding:
- Herbs like basil or oregano – for a fresh, Italian twist.
- Olives – a briny kick that works wonders with the parmesan.
- Crushed red pepper flakes – for those who crave a bit of heat.
Feel free to experiment with these add-ins; after all, baking is about creativity and personal taste. So, what will you try?
Step-by-step Preparation of Sun-Dried Tomato Sourdough Bread
Making sun-dried tomato sourdough bread is not only a rewarding experience but also a delightful venture into the world of baking. With a few essential steps, you can create a beautiful loaf that complements your meals perfectly. Let’s dive into the process!
Activate your sourdough starter
Start by feeding your sourdough starter about 6–12 hours before you plan to mix your dough. The key here is to make sure it’s bubbly and lively by the time you’re ready to knead—it’ll make a world of difference in your bread's rise. If you don’t have a starter yet, check out my guide on how to create your own from scratch!
Roast the garlic for rich flavor
Next, let's add another layer of flavor! Preheat your oven to 425°F. Wrap the intact garlic cloves in aluminum foil with a drizzle of olive oil and roast for around 30 minutes. The end goal is soft, golden garlic that you can easily squeeze from its skin. Once cooled, mash it up and combine it with your sun-dried tomatoes to prepare for the collation of flavors.
Mixing the dough base
In a large bowl, whisk together 1 ½ cups of warm water (80-90℉) and your activated sourdough starter until mostly dissolved. Gradually add in 4 cups plus 3 tablespoons of bread flour along with 3 ½ teaspoons of kosher salt, stirring until no dry bits remain. Cover this shaggy dough and let it rest for 20 minutes. This resting stage, known as autolyse, helps with gluten formation.
Incorporating sun-dried tomatoes and cheese
This is where the magic happens! Gently press the dough down and sprinkle in your garlic-tomato mix and grated parmesan cheese. Employ the stretch and fold technique—lift and stretch the dough over itself, rotating the bowl as you go. Continue until everything is nicely incorporated. Cover and let it rest again for 20 minutes.
Stretch and fold technique
After the initial resting, you’ll want to perform several rounds of stretch and folds. Do this three more times, spaced 20 minutes apart. This technique helps to develop structure in your dough, critical for achieving that perfect chewy texture.
Shaping the loaf
Once the dough has risen and feels puffy, it’s time to shape your loaf. Turn it out onto a lightly floured counter and gently shape it into a rectangle. Fold the edges in and then form it into a round or oval shape, depending on your preference.
Proofing your dough
Now, it's time to let your dough do its thing! Placing it seam-side up in a generously floured proofing basket, let it rest for 12–16 hours in the fridge. This slow, cold proof enhances the flavor and makes for a beautiful crust.
Baking in a Dutch oven
Preheat a lidded Dutch oven to 450°F before you bake. When ready, score the top of your dough and transfer it into the hot pot. Baking with the lid on creates steam, helping to form that coveted crust. After 40 minutes, take the lid off for the final touch—another 5-10 minutes should do the trick. Once baked, allow it to cool for at least 2 hours before slicing into your incredible sun-dried tomato sourdough bread.
Creating this rustic bread not only fills your kitchen with delightful aromas but also allows for a fantastic base for shared meals or a delightful snack. Enjoy each step and savor the process!

Variations of Sun-Dried Tomato Sourdough Bread
Add olive tapenade for a Mediterranean twist
For an irresistible Mediterranean flair, consider incorporating olive tapenade into your sun-dried tomato sourdough bread. This rich and savory spread, made from olives, capers, and herbs, enhances the overall flavor profile while adding a delightful briny note. Simply swirl in ½ cup of tapenade during the mix-ins stage for a burst of umami that pairs beautifully with the roasted garlic and parmesan. It’s a quick way to elevate your bread for appetizers or a fancy brunch.
Experimenting with different cheese
Don’t hesitate to get creative with the cheese! While parmesan delivers a lovely nuttiness, consider experimenting with other varieties like feta or goat cheese for a tangy twist. Each option provides a unique taste experience. For those who love a hint of spice, pepper jack cheese can offer an exciting kick. Remember, the cheese melts into the dough, creating pockets of flavor that will keep your taste buds intrigued. Try mixing and matching to discover your perfect combination!
For ideas on pairing cheese with bread, check out The Cheese Plate, a resource filled with expert advice and pairing suggestions.
Cooking Tips and Notes for Sun-Dried Tomato Sourdough Bread
Troubleshooting Common Issues
If your sun-dried tomato sourdough bread doesn't rise as expected, it may be due to an inactive starter or cooler kitchen temperatures. Ensure your sourdough starter is bubbly and active before starting (check out this guide on keeping your starter lively). Additionally, if the crust is too hard, try reducing the baking time or covering it with a kitchen towel right after removing it from the oven.
Importance of Patience in Sourdough
Sourdough is all about patience. Allowing your dough to ferment and rise properly will result in better flavor and texture. Keep in mind that every kitchen environment is different; sometimes, your dough may need extra time to rise. Try to resist the urge to rush—the wait is worth it when that fragrant bread comes out of the oven! Your future self will thank you with each delicious slice.
Serving Suggestions for Sun-Dried Tomato Sourdough Bread
Savoring it with Spreads and Dips
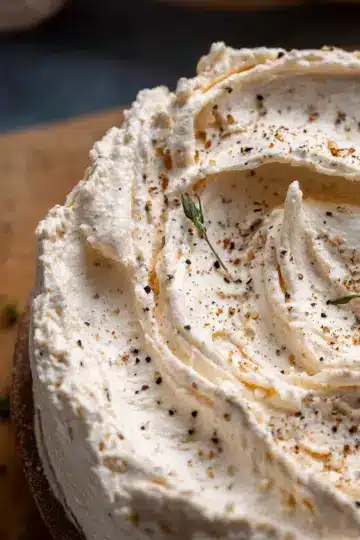
The sun-dried tomato sourdough bread's rich flavors make it a perfect companion for various spreads and dips. Try spreading a dollop of herbed cream cheese or a tangy hummus for an effortless appetizer. If you're feeling adventurous, a zesty pesto pairs beautifully, enhancing the bread's savory notes. For a simple treat, a drizzle of balsamic glaze can elevate those roasted garlic and parmesan flavors.
Creative Uses in Sandwiches and Appetizers
This delightful bread is also ideal for building mouthwatering sandwiches. Layer it with turkey bacon, fresh greens, and avocado for a satisfying lunch, or craft a vibrant bruschetta with diced tomatoes, basil, and a sprinkle of mozzarella. You can even slice it thin and toast it for crispy crostinis topped with your favorite antipasti. The options are endless!
For more ideas, consider checking out these delicious sourdough recipes from experts at King Arthur Baking and Serious Eats.
Time Breakdown for Sun-Dried Tomato Sourdough Bread
Preparation Time
The journey begins with a preparation time of 1 day and 12 hours. This includes feeding your starter and allowing the dough to rise, making sure those sun-dried tomatoes and roasted garlic create the best flavor possible.
Cooking Time
When it comes to cooking, you'll spend about 45 minutes in the oven. This is when the magic happens—turning that dough into a beautifully crusty, aromatic bread.
Total Time
In total, you’ll need around 1 day and 14 hours and 45 minutes. It may sound lengthy, but most of this time is hands-off, allowing you to attend to other activities while your sun-dried tomato sourdough bread develops its unique texture and flavors.
Baking your own bread is a rewarding experience, and this recipe is perfect for anyone looking to impress at their next gathering. Need more inspiration? Check out guides on baking basics or sourdough starter tips. Happy baking!
Nutritional Facts of Sun-Dried Tomato Sourdough Bread
Calories per slice
Each slice of this delicious sun-dried tomato sourdough bread contains approximately 205 calories, making it a satisfying yet light choice for bread lovers.
Key nutritional highlights
When you enjoy this bread, you also benefit from:
- Protein: 8.5g per slice, supporting muscle health.
- Fiber: 1.5g aids in digestion, enhancing gut health.
- Vitamins & Minerals: Includes calcium and potassium, essential for bone and heart health.
Packed with irresistible flavors and nutrients, this sun-dried tomato sourdough bread is perfect for enhancing your meals! For detailed health benefits, check out resources from Harvard Health and Nutrition.gov.
FAQs about Sun-Dried Tomato Sourdough Bread
Can I make this recipe with whole wheat flour?
Absolutely! Whole wheat flour can add a delightful nutty flavor to your sun-dried tomato sourdough bread. Just keep in mind that it may require more water to achieve the right dough consistency. A good starting point is to replace up to 50% of the bread flour with whole wheat flour, adjusting as needed.
How do I know when my sourdough is ready to bake?
The perfect time to bake your dough is when it has nearly doubled in size and feels puffy and jiggly. You can do the "poke test": gently poke the dough with a finger; if the indentation springs back slowly, your dough is ready.
What’s the best way to store leftover sourdough bread?
To keep your sun-dried tomato sourdough bread fresh, store it at room temperature in a breathable bag (not plastic). For longer storage, slice it and freeze it. Just wrap individual slices in parchment or wax paper before putting them in a freezer bag. This way, you'll always have delicious bread on hand!
Feel free to reach out with more questions, and happy baking! For detailed step-by-step instructions, check out my full recipe.
Conclusion on Sun-Dried Tomato Sourdough Bread
In summary, this sun-dried tomato sourdough bread is more than just a loaf; it’s a culinary experience! With its delightful blend of roasted garlic, parmesan, and sun-dried tomatoes, it’s perfect for any occasion. Enjoy fresh, toasted, or as part of a charcuterie board. Happy baking!

Sun-Dried Tomato Sourdough Bread (with Roasted Garlic & Parmesan)
Equipment
- Kitchen scale
- mixing bowls
- Straight-sided container (optional)
- Bench scraper
- Banneton or bowl lined with tea towel
- Bread sling or parchment paper
- Lame or sharp knife
- 6-quart Dutch oven
Ingredients
Roasted Garlic
- 5 cloves garlic peel intact
- 1 teaspoon olive oil
Dough Ingredients
- 1.5 cups warm water 80-90℉
- 0.5 cup active sourdough starter
- 4.1875 cups bread flour (500 grams)
- 3.5 teaspoons Diamond Crystal Kosher Salt if using Morton's or table salt, measure by weight or reduce volume by half
- 0.5 cup sun-dried tomatoes drained, roughly chopped
- 0.5 cup grated parmesan cheese
- rice flour for proofing basket
- 2 ice cubes ice cubes for steam
Instructions
Preparation
- Feed your starter 6–12 hours before mixing your dough. It should be bubbly and active by the time you’re ready to bake.
- Preheat your oven to 425°F. Place the garlic cloves (peels still on) on a small piece of aluminum foil, drizzle with olive oil, and loosely wrap them up—leaving a little room for air to circulate. Roast for about 30 minutes, until golden, soft, and fragrant. Let cool slightly, then squeeze the garlic from the peels, mash, and mix with the chopped sun-dried tomatoes. Set aside.
- In a large bowl, whisk together warm water and sourdough starter until mostly dissolved. Add the bread flour and salt. Mix until no dry bits remain and you have a shaggy dough. Cover and let rest for 20 minutes.
- Lightly dampen your hands. Gently press the dough into a flat-ish shape in the bowl. Sprinkle on ¼ of the garlic-tomato mixture and ¼ of the parmesan cheese. Do a stretch and fold (lift, stretch, and fold the dough over itself), rotate the bowl 90°, and repeat. Continue until all the garlic, tomatoes, and cheese are added. Shape the dough into a loose ball and place seam side down in the bowl. Cover and rest for 20 minutes. Do 3 more rounds of stretch and folds, each spaced 20 minutes apart.
- Cover the dough and let it rise at room temperature until it's puffy, jiggly, and nearly doubled in size. This usually takes 4–12 hours (or longer), depending on room temp and your starter. Use a straight-sided container to track the rise more easily.
- Lightly flour your counter and gently turn the dough out. Pull it into a rough rectangle. Fold the long edges toward the center (like a letter), then fold the short sides. Flip seam-side down, gently round it into a ball. Cover and let rest for 15 minutes.
- For a round loaf (boule), repeat the shaping technique above. For an oval loaf (batard), fold the short edges in, then roll into a tight log from the long edge, pinching the ends to seal.
- Generously flour your proofing basket with rice flour. Place the dough seam-side up in the basket. Pinch or stitch the seam if needed. Cover and refrigerate overnight for 12–16 hours.
- Place a lidded Dutch oven inside your oven and preheat to 450℉. Let the Dutch oven heat for an extra 30-60 minutes once the oven reaches temperature.
- Turn the dough out onto a bread sling or piece of parchment paper. Score the top as desired with a lame or sharp knife. Carefully place 2 ice cubes in the Dutch oven for steam. Use the sling or parchment paper to transfer the dough into the hot Dutch oven. Cover immediately with the lid to trap the steam inside.
- Bake at 450℉ for 40 minutes with the lid on. Then, remove the lid and bake for an additional 5-10 minutes, if needed, to achieve your desired crust color.
- Transfer the loaf to a wire rack and let it cool for at least 2–4 hours before slicing.


Leave a Reply