
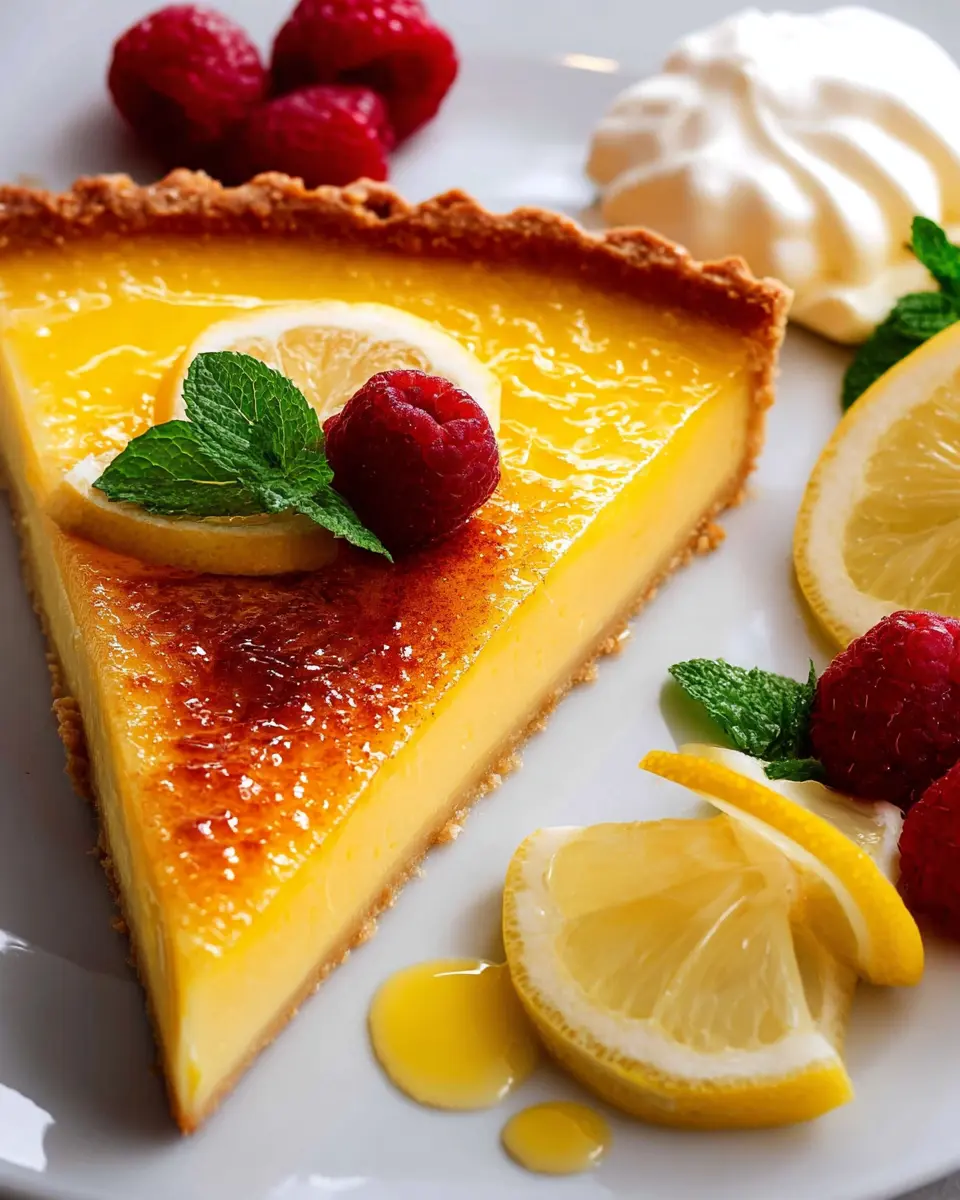
Introduction to Lemon Tart
A lemon tart is a delightful combination of sweet and tart flavors that brings a refreshing zest to any dessert table. If you've never tried making one at home, you're in for a treat! There's something incredibly satisfying about crafting your own pastry while filling the house with the bright aroma of freshly squeezed lemons. Not to mention, the skills you'll gain from making a lemon tart can be applied to a variety of other desserts – think of all the possibilities!
Why You Should Try Making Lemon Tart at Home
Making a lemon tart at home not only allows for customization, but it’s also a fun and engaging process that offers impressive results.
- Fresh Ingredients: You'll know exactly what's going into your dessert, from the organic lemons to the real butter.
- Creativity: Use your creativity by choosing to decorate it with fresh fruit or edible flowers.
- Perfect for Any Occasion: Whether it's a cozy dinner with friends, a potluck, or simply a sweet treat for yourself, lemon tart fits any occasion beautifully.
If you're looking for a dessert that balances sweetness with a burst of citrusy brightness, don’t hesitate to try your hand at this classic dish! Check out this breakdown of tips for more advice on making the perfect tart. Happy baking!

Ingredients for Lemon Tart
When it comes to creating a delightful lemon tart, the quality of your ingredients is key. This recipe consists of two main components: the crust and the filling. Let’s dive into what you need to make this classic dessert shine!
Essential ingredients for the crust
The crust is the foundation of your lemon tart, so you'll want to ensure it's both flaky and flavorful. Here’s what you need:
- Sweet tart crust: You can either make a homemade sweet tart crust using this recipe, or opt for a store-bought version. A 23cm or 9-inch sweet pie crust works perfectly.
Key ingredients for the filling
The filling is where the magic happens! A perfectly balanced lemon filling is crucial to achieving that refreshing, tangy flavor. Here’s what you'll need:
- Lemon zest: Freshly grated zest from one lemon adds depth to the flavor.
- Lemon juice: About half a cup, freshly squeezed from one to two lemons, is ideal.
- Sugar: Three-quarters of a cup provides the sweetness needed to balance the tanginess.
- Unsalted butter: Twelve tablespoons, cut into cubes, to give the filling richness.
- Eggs: Three large whole eggs and three egg yolks contribute to a smooth and creamy texture.
With these ingredients at hand, you’re all set to whip up a scrumptious lemon tart!
Step-by-step Preparation for Lemon Tart
Making a lemon tart can seem daunting, but with a little patience and the right steps, you’ll find it’s an enjoyable process. Let’s dive into each step together!
Making the tart crust
The crust is the foundation of your lemon tart, so let’s start here. You can either opt for a homemade sweet tart crust or use a store-bought one for convenience. If you decide to make it from scratch, roll out the dough carefully and press it into a tart pan, ensuring there are no gaps. Don’t forget to blind bake it! This means you’ll partially cook the crust before adding the filling to prevent it from becoming soggy. Once it’s golden brown, let it cool completely. This step is crucial as a warm crust might affect the lemon filling’s texture.
Preparing the lemon filling
Now that your crust is ready, we turn our attention to the zesty filling. In a medium saucepan, combine the lemon zest, fresh lemon juice, white sugar, and cubes of unsalted butter. The zest adds a fragrant kick, so don’t skip it! Whisk everything together until smooth. This playful combination of brightness and sweetness is the heart of your tart and what makes it so delightful.
Cooking the lemon filling on the stove
Next, it’s time for a little gentle heat! Place your saucepan on low to medium-low heat. Keep whisking as the butter melts; this helps emulsify the mixture and gives a lovely creamy texture. You’ll want to stay attentive here, ensuring the filling thickens—this should take around 5 minutes, but keep in mind every stovetop behaves differently. The filling should visibly mound when dolloped, indicating it’s ready for the next step. Make sure to strain it through a fine-mesh sieve to catch any bits of zest or coagulated egg, ensuring a silky smooth filling.
Filling the tart shell
Carefully pour the thickened lemon filling into your cooled tart shell. Use an offset spatula to smooth out the surface, making it look nice and polished. This little detail enhances the presentation, which is always a bonus, especially if you’re serving guests—or just treating yourself!
Baking the tart to perfection
Lastly, bake your filled tart at 180℃/350℉ for about 5 minutes. It’s normal for it to still feel a bit soft when touched, but don’t worry; it will set as it cools. Once it’s out of the oven, allow it to cool completely before slicing. This way, you'll achieve those perfect, clean cuts, revealing the stunning lemon filling. For a finishing touch, consider adding lemon slices or a dusting of icing sugar to make it visually appealing.
Follow these steps, and you’ll have a beautiful lemon tart that’s sure to impress at your next gathering or as a delightful treat for yourself!
Variations on Lemon Tart
Lemon Meringue Tart Twist
Looking to elevate your classic lemon tart? Why not try a lemon meringue tart twist! Top your tart with a fluffy meringue and toast it lightly in the oven for a delightful contrast between the tangy filling and the sweet, airy topping. This delightful version adds a new dimension to your lemon tart experience.
Adding Berries for an Extra Zing
If you love brightness, fresh berries are a fantastic addition to your lemon tart. Strawberries, blueberries, or raspberries beautifully complement the tartness of the lemon filling while adding a pop of color. Just scatter a handful of mixed berries over the top before serving or incorporate them into the filling itself for added texture and that extra zing of flavor. Don’t hesitate to experiment, as the possibilities really are endless!
For more variations and inspirations, check out this article on lemon tart ideas.
Cooking Tips and Notes for Lemon Tart
Importance of Ingredient Temperature
When making a perfect lemon tart, remember that the temperature of your ingredients matters. Ensure your butter is at room temperature for a smoother filling. This helps in better emulsification, ensuring rich and creamy results. Similarly, eggs should be at room temperature to integrate seamlessly into your filling mixture. If they’re cold, they may cause the butter to harden, leading to a lumpy texture.
How to Avoid a Runny Filling
To achieve a perfectly set lemon tart, thickening the filling on the stove is essential. Whisk constantly until it visibly mounds, which usually takes about 5 minutes. Don't rush this step! If the filling isn’t thick enough before baking, your tart may end up runny. To learn more about achieving the perfect lemon custard, check out this guide for practical tips.
Happy baking!

Serving Suggestions for Lemon Tart
Pairing with Whipped Cream or Crème Fraîche
Nothing complements a rich lemon tart quite like a dollop of whipped cream or crème fraîche. The sweetness of the whipped cream beautifully balances the tartness of the lemon, while crème fraîche adds a delightful tang that enhances the overall flavor profile. For an extra touch, consider lightly flavoring your whipped cream with vanilla extract or a hint of lemon zest!
Creative Garnishing Ideas
Elevate your lemon tart's appearance and flavor with creative garnishes. Here are a few ideas:
- Fresh Berries: Add a handful of raspberries or blueberries for a burst of color and flavor.
- Citrus Slices: Thinly slice lemons or limes to place atop the tart, adding a vibrant visual appeal.
- Herbs: A sprig of mint or basil can give a refreshing twist.
- Icing Sugar: Dust with powdered sugar for a sweet finish that looks stunning.
These simple enhancements can take your lemon tart from delicious to extraordinary!
Time Breakdown for Lemon Tart
Preparation time
The preparation time for your delightful lemon tart is approximately 20 minutes. This includes gathering your ingredients and whisking them together for the filling.
Cooking time
Once your delicious filling is ready, the cooking time is around 10 minutes. This allows for baking the tart until it's just right.
Total time
In total, you’re looking at about 30 minutes to prepare and bake this lemony treat. Just imagine indulging in a slice of your homemade tart shortly after your culinary efforts!
Don’t forget, a perfectly baked tart is best served after cooling to allow those flavors to meld beautifully. Happy baking!
For detailed instructions on making the sweet tart crust, check out this recipe.
Nutritional Facts for Lemon Tart
Calories per serving
A delightful lemon tart serves up approximately 183 calories per slice. While it’s a treat, it’s essential to enjoy it in moderation alongside a balanced diet.
Key nutritional components
This lemon tart packs a flavorful punch with valuable nutrients:
- Carbohydrates: 13g
- Protein: 3g
- Fat: 13g (8g saturated)
- Cholesterol: 112mg
- Fiber: 1g
- Vitamin A: 470IU
With a zesty lemon kick and rich texture, this dessert can be enjoyed guilt-free as part of your occasional indulgences. For more healthy dessert ideas, check out our nutritional guides!
FAQ about Lemon Tart
How do I store leftover lemon tart?
Leftover lemon tart can be stored in a sealed container in the refrigerator for up to four days. For the best flavor and texture, enjoy it at room temperature, but cold is just as delightful! Just ensure it's covered well to maintain its freshness.
What's the best way to reheat lemon tart?
If you prefer your lemon tart warmed slightly, try reheating it in the oven. Preheat the oven to 150℃ (300℉), then place the tart in for about 10 minutes. This gentle heat will enhance its flavors without compromising the filling's creamy texture. Avoid the microwave, as it can make it rubbery!
Can I use bottled lemon juice instead of fresh?
While using bottled lemon juice might be a time-saver, fresh lemon juice really elevates the flavor of your lemon tart. Fresh juice offers vibrant acidity and aromatic zest that's hard to replicate. If you must use bottled, opt for a high-quality brand and add a bit of zest to mimic that fresh taste.
For more tips and recipes, check out resources like The Kitchn and Serious Eats. Happy baking!
Conclusion on Lemon Tart
Creating your own lemon tart can be a delightful culinary adventure! Don't hesitate to experiment with flavors or garnishes that resonate with your taste. Whether you enjoy it with a dollop of whipped cream, fresh fruit, or just as it is, each attempt brings you closer to a dessert masterpiece. Happy baking!

Lemon Tart
Equipment
- Medium saucepan
- fine-mesh strainer
- offset spatula
Ingredients
Tart Crust
Lemon Tart filling
- 1 tablespoon lemon zest (1 lemon's worth)
- ½ cup lemon juice (from 1 – 2 lemons)
- ¾ cup white sugar
- 12 tablespoon unsalted butter , cut in 1cm (½") cubes
- 3 whole eggs large
Instructions
Tart Crust
- Make tart crust per linked recipe, including blind baking the empty tart crust. Allow to fully cool before filling.
Lemon Tart filling
- Preheat oven to 180℃/350℉ (160℃ fan).
- Put all ingredients in a medium saucepan and whisk to combine.
- Place the saucepan on the stove over low / medium-low heat. Whisk constantly until the mixture thickens enough to visibly mound on the surface when dolloped.
- Strain into a bowl using a fine mesh strainer.
- Pour into tart shell and smooth the filling surface using an offset spatula.
- Bake for 5 minutes.
- Cool tart fully to allow it to set before slicing to serve.
- Decorate if desired with lemon slices, edible flowers, raspberries, whipped cream, or dust with icing sugar.
Leave a Reply