
Introduction to Mini Lemon Meringue Tarts
When it comes to delightful desserts, mini lemon meringue tarts are an absolute showstopper. These petite treats pack a punch of tangy lemon curd enveloped in a buttery, flaky pastry crust, crowned with a cloud of sweet, fluffy meringue. Perfect for parties, picnics, or just an afternoon pick-me-up, they’re bite-sized bliss that everyone adores.
Why Mini Lemon Meringue Tarts Are the Ultimate Treat?
So, what makes these tarts the ultimate treat? To start, their charming size allows for easy sharing and portion control, making them ideal for gatherings. Each tart is like a little hug of flavor, mixing the brightness of lemon with the sweetness of the meringue—a delightful contrast that leaves your taste buds dancing.
Plus, the process of making them can be a fun and interactive kitchen adventure! Whether you’re a seasoned baker or a complete novice, crafting these tarts can ignite your culinary creativity. For a deeper dive into flavourful lemon treats, you might also enjoy learning about the health benefits of lemons Healthline.
When you serve mini lemon meringue tarts, you're not just offering a dessert; you're creating a memorable experience for your guests. Are you ready to whip up these heavenly delights? Let's get started!

Ingredients for Mini Lemon Meringue Tarts
Essential ingredients for the tarts
To craft delightful mini lemon meringue tarts, you'll need the following essential ingredients:
- ¾ cup (110g) all-purpose flour: This forms the base of your tart pastry.
- 2 tablespoons (25g) butter: Provides richness and flavor.
- Cold water to mix: Just enough to bring your pastry dough together.
- 1 cup lemon curd: A zesty, sweet filling that steals the show—homemade or store-bought will do.
- 2 egg whites: The star of your fluffy meringue topping.
- ½ cup (120g) caster sugar: This sweetens your meringue and helps it achieve its perfect texture.
Optional ingredients for personalization
Don’t hesitate to make these tarts your own! Here are some optional ingredients for a personal touch:
- Zest of a lemon: To enhance the lemony flavor in the filling.
- Vanilla extract: A splash can add a lovely depth to your meringue.
- Fresh berries: Add a layer on top for a burst of color and flavor.
- Mint leaves: Use them as a garnish for a fresh finish.
Feel free to experiment with these additions! Your mini lemon meringue tarts will be both delicious and uniquely yours. For more tips on lemon curd, check out this guide.
Step-by-step Preparation of Mini Lemon Meringue Tarts
Creating mini lemon meringue tarts at home is a delightful way to impress your friends and family. Let’s walk through this fun process step by step!
Prepare the shortcrust pastry
The foundation of your tarts begins with the shortcrust pastry. Start by sifting ¾ cup of all-purpose flour into a large bowl. Next, chop 2 tablespoons of butter into small cubes and add them to the flour. Rub the butter and flour together with your fingertips, lifting your hands to incorporate air. This should yield a crumbly texture. Gradually add cold water—just enough to form a ball of dough without it sticking. Once combined, wrap the pastry in plastic wrap and let it chill in the fridge for at least 30 minutes. This cooling step is crucial, as it prevents shrinkage during baking.
Create the meringue
While your pastry is resting, you can prepare the fluffy meringue. In a mixing bowl, use an electric whisk to beat 2 egg whites until stiff peaks form. You want them so firm that you could turn the bowl upside down without it sliding out! Gradually incorporate ½ cup of caster sugar, whisking until it’s fully dissolved and the meringue is glossy. This process not only stabilizes the meringue but also adds that sweet touch that perfectly complements the tartness of the lemon curd.
Assemble the tarts
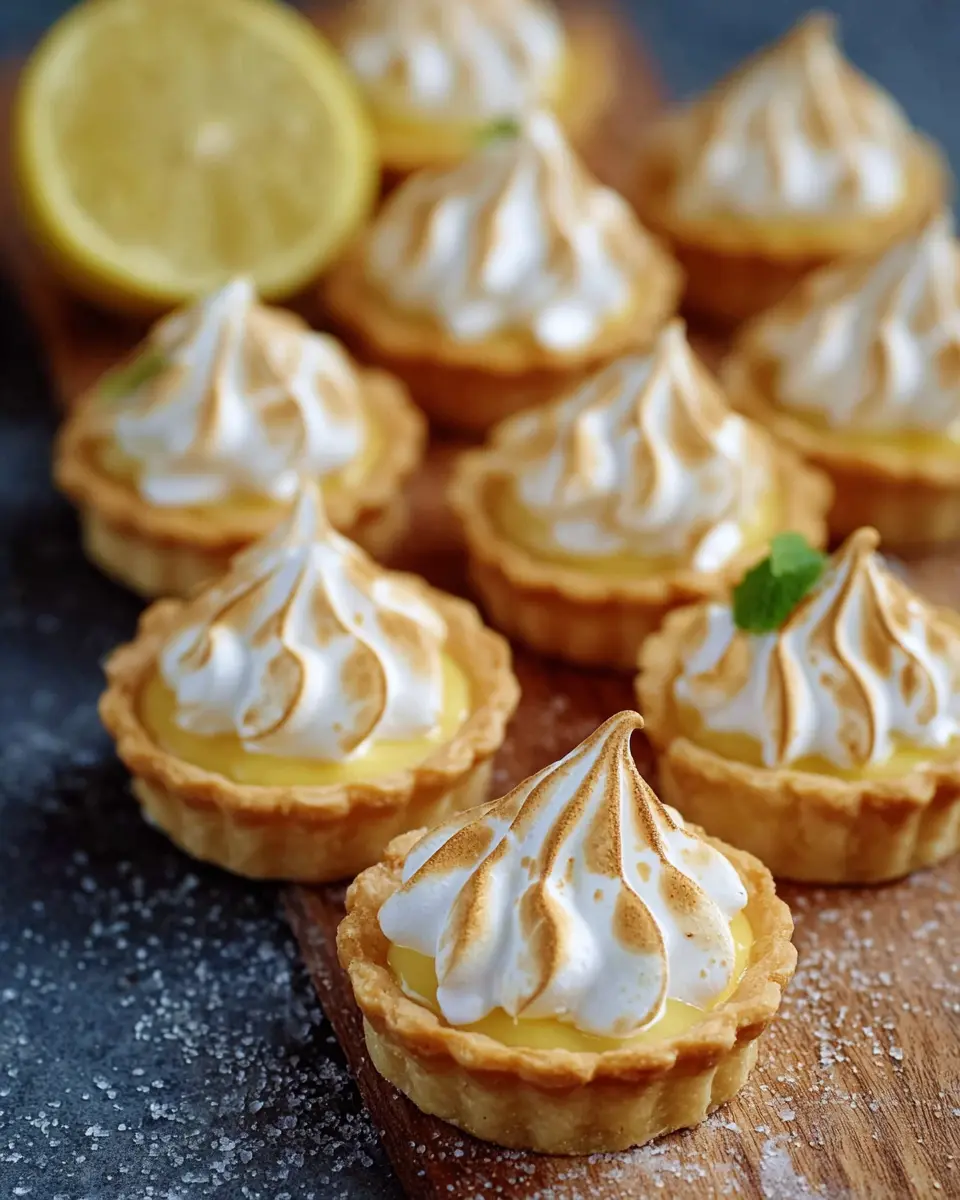
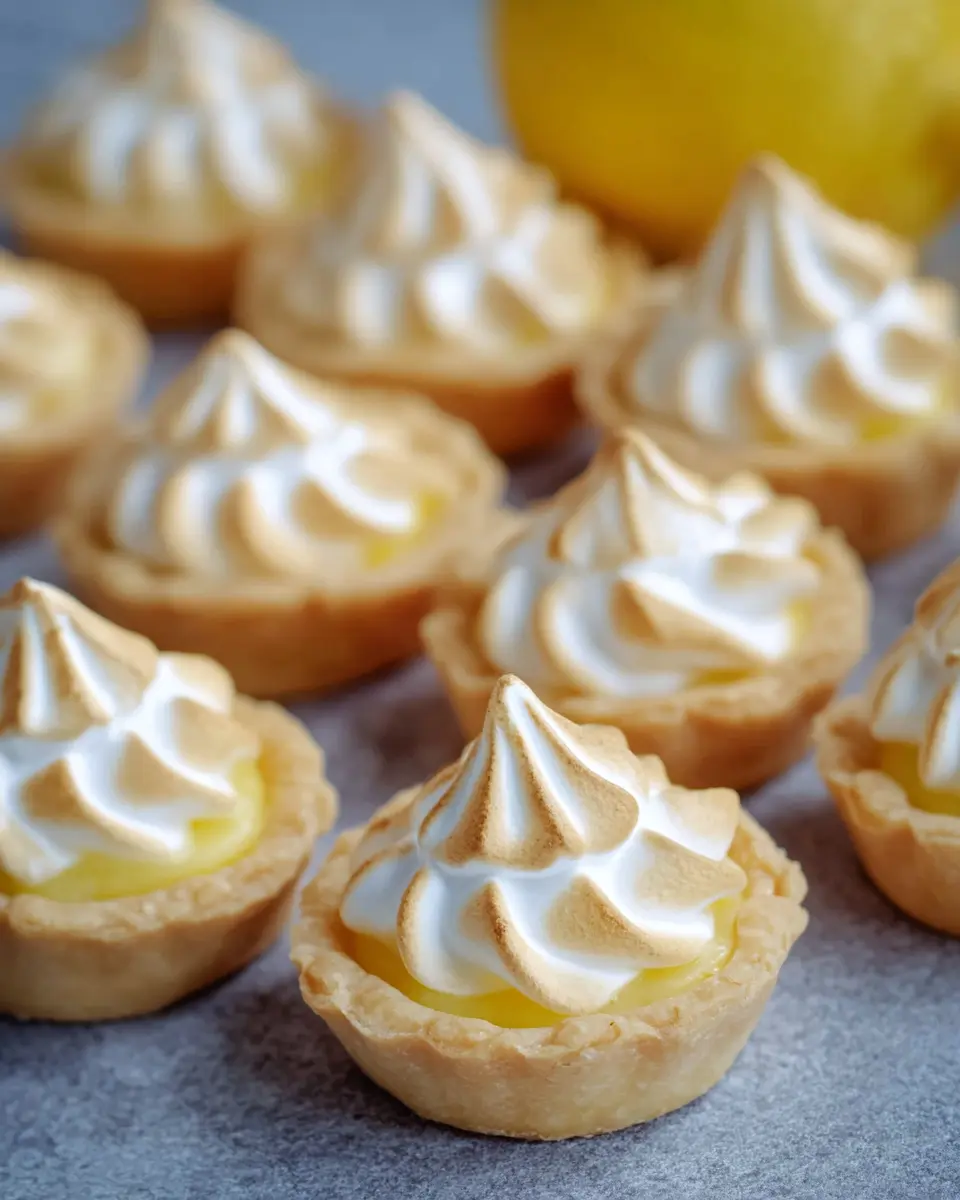
With your pastry chilled and meringue ready, it’s time to assemble these mini lemon meringue tarts. Preheat your oven to 200°C (400°F). Roll out the pastry to around 2mm thick, and use a round pastry cutter to cut out circles—these should fit perfectly in your lightly greased mini muffin pan. Press each pastry circle into the muffin tin, pricking them with a fork to avoid air pockets. Bake these for 5-10 minutes until they’re lightly golden and crisp, then allow them to cool.
Fill each golden pastry shell with approximately 1 cup of lemon curd using a piping bag. You can make your own lemon curd or use store-bought for convenience—both options yield delicious results!
Bake the tarts for that golden finish
Next, it’s time to add a dollop of your beautifully whipped meringue on top of the lemon curd in each tart. Pipe it for a lovely presentation! Bake them again for about 5 minutes, or until the meringue is a charming golden brown. The contrast between the bright lemon and the crisp meringue is simply irresistible.
Allow tarts to cool before serving
After baking, let your mini lemon meringue tarts cool. This resting period allows the flavors to meld beautifully and makes handling them easier. Plus, the anticipation will only heighten the enjoyment when you finally serve them! When they’re ready, you’ll have a delightful treat perfect for casual gatherings or a sweet ending to any meal. Enjoy!
Variations on Mini Lemon Meringue Tarts
Exploring different variations of mini lemon meringue tarts can be a fun culinary adventure! Here are two delightful twists to consider for your next gathering:
Berry-Topped Mini Lemon Meringue Tarts
Add a splash of color and flavor by crowning your tarts with fresh berries. Raspberries, blueberries, or sliced strawberries not only elevate the presentation but also add a delightful tartness that complements the lemon. Just place a few berries on top of the meringue right before serving for a refreshing touch.
Chocolate Mini Lemon Meringue Tarts
For chocolate lovers, consider infusing your lemon curd with melted dark chocolate. This unexpected pairing offers a rich depth that beautifully contrasts the tart lemon flavor. Drizzle some chocolate ganache over the meringue for a stylish finish that will wow your guests.
Explore these variations to keep your mini lemon meringue tarts interesting and delicious!
Cooking Tips and Notes for Mini Lemon Meringue Tarts
Common mistakes and how to avoid them
Creating mini lemon meringue tarts can be delightful, but there are a few common pitfalls to watch out for. Make sure to prevent overworking your pastry, which can lead to a tough crust. Also, when filling the pastry cups, avoid overfilling to prevent any lemon curd from spilling out. Lastly, don't rush the meringue: adding sugar too quickly can result in a grainy texture.
For a deeper dive into meringue tips, check out BBC Good Food’s guide on meringues.
How to achieve the perfect meringue
To ensure your meringue is fluffy and stable for your mini lemon meringue tarts, start with clean, dry equipment. Beat the egg whites until foamy before gradually adding sugar. This method helps create a glossy finish. Remember, patience is key: allow the meringue to reach stiff peaks, which will give it that impressive height and texture. Baking just until golden will also prevent it from overcooking. Happy baking!
Serving Suggestions for Mini Lemon Meringue Tarts
Perfect pairings with tea or coffee
These delightful mini lemon meringue tarts shine brightest when served alongside a comforting cup of tea or coffee. Pair them with a robust Earl Grey or a smooth cappuccino to complement the tartness of the lemon. For a more refreshing touch, consider a light green tea or a citrus-infused herbal tea. The contrast of flavors will elevate your dessert experience, making it a lovely treat for afternoon gatherings or a cozy weekend brunch.
Creative presentation ideas
Serving your mini lemon meringue tarts with flair can make all the difference. Try arranging them on a decorative cake stand or a colorful platter to create an eye-catching display. You could even garnish each tart with a sprinkle of edible lavender or lemon zest. For an extra touch, place a fresh mint leaf or a slice of lemon on top of each tart before serving—it's simple yet elegant! This attention to detail will impress your guests and make your dessert table unforgettable.
Time Breakdown for Mini Lemon Meringue Tarts
Preparation time
The prep time for these delightful mini lemon meringue tarts is approximately 45 minutes. This step involves making the delicious shortcrust pastry and whipping up the zesty lemon filling. Don't rush; savor the process—it’s part of the fun!
Cooking time
Once your tarts are prepped, the cooking time is just about 10 minutes. This includes baking the pastry and putting the finishing touches on the meringue. Plus, a few extra minutes for the meringue to reach that lovely golden-brown color.
Total time
In total, you’ll be looking at around 1 hour and 25 minutes for the entire process. This time investment is well worth it for these crowd-pleasing treats. They can easily be made ahead of time, so you can impress your guests with these irresistible mini lemon meringue tarts at your next gathering!
For similar delightful recipes and ideas, check out BBC Good Food for inspiration on desserts and baking techniques.
Nutritional Facts for Mini Lemon Meringue Tarts
Calories per tart
Each delightful mini lemon meringue tart contains approximately 56 calories. This makes them a guilt-free treat to enjoy at any gathering!
Nutritional breakdown
Here’s a closer look at what each tart offers:
- Carbohydrates: 7g
- Protein: 1g
- Fat: 3g (Saturated Fat: 2g, Polyunsaturated Fat: 1g)
- Cholesterol: 16mg
- Sodium: 31mg
- Sugar: 4g
These mini lemon meringue tarts are not only delicious but also a lighter dessert option! For more detailed nutritional guidance, check out credible sources like Nutrition.gov which can provide further insights into healthy eating habits. Whether decorating your dessert table or enjoying a weekend treat, these tarts fit the bill.
FAQ about Mini Lemon Meringue Tarts
How long can I store these mini tarts?
You can store your mini lemon meringue tarts in the refrigerator for up to 2 days. However, for the best texture, it's ideal to enjoy them the same day they are made. The meringue can become a bit gooey if kept for too long, but they’ll still taste delicious!
Can I use store-bought lemon curd?
Absolutely! Using store-bought lemon curd is a great time-saver. Just choose a good quality brand for the best flavor. If you want to try making your own, the BBC Good Food website has a fantastic homemade recipe.
What can I do with leftover meringue?
Leftover meringue is a delightful treat! You can pipe it into small shapes on a baking sheet and create meringue cookies or tops for other desserts. Alternatively, consider using it in a pavlova or as a topping for ice cream. The possibilities are delicious!
Conclusion on Mini Lemon Meringue Tarts
These mini lemon meringue tarts are a delightful way to end any gathering. Not only do they offer a refreshing burst of citrus, but their adorable size makes them irresistible! Enjoy crafting these treats, and don’t hesitate to share them at your next event for compliments galore. Happy baking!

Mini Lemon Meringue Tarts
Equipment
- Rolling Pin
- spatula
- Non-Stick Mini Muffin and Cupcake Pan
- Round Pastry Dough Cutter
- Disposable Piping Bags
- Wilton Icing Tip Set, X-Large
Ingredients
Pastry
- ¾ cup all purpose flour 110g
- 2 tablespoon butter 25g
- cold water to mix
Filling
- 1 cup lemon curd see notes
Meringue
- ½ cup caster sugar 120g
Instructions
Make the Shortcrust Pastry
- Sieve the flour into a large bowl.
- Cut the butter up into small cubes and drop into the flour. Use your fingertips to quickly and lightly rub the butter into the flour. Lift your fingers up high to air the ingredients.
- Once the flour mixture is uniformly crumbly, use an icing spatula or palette knife to slowly mix in the water, a dribble at a time, mixing continuously.
- Finally use your hands to bring the pastry together into a ball. It should leave the bowl clean but not be sticky.
- Wrap the pastry in plastic wrap and leave it to rest in the fridge for at least 30 minutes.
Make the Meringue
- Use an electric whisk to whisk egg whites in a bowl until they reach stiff peaks and you can turn the bowl upside down without them sliding out.
- Add the sugar one quarter at a time and whisk until stiff peaks form each time.
Assemble the Tarts
- Pre-heat the oven to 200C / 400F. Lightly grease a mini muffin pan.
- Roll out the pastry until fairly thin - around 2mm.
- Use a cookie cutter to cut out circles in the pastry. Make sure the pastry circles are the right size to fill the muffin tin without spilling over. Do a test one before cutting out all the circles.
- Gently press the pastry circles into the muffin pan and ensure no air pockets are underneath the pastry. Prick each pastry cup several times with a fork. Place in the oven and cook for 5-10 minutes until lightly browned. Remove from tin and allow to cool.
- Fill a piping bag with a large icing nozzle (I use the Wilton 1A) with the lemon curd. Fill each pastry cup with the lemon curd.
- Fill another piping bag with a large icing nozzle (I use the Wilton 1M) with the meringue. Pipe a small dollop of meringue on top of each tart.
- Bake in the oven for around 5 minutes until the meringue is golden brown.
- Allow to cool before serving.

Leave a Reply